Quick Note
This guide is kinda scuffed, but I hope it is comprehensive enough to explain how to best use this application. The first-time user video is probably better, so go watch that too!
Video Guide for First Time Users
What is Repcode?
Repcode is a platform built to empower software engineers to excel in Leetcode-style technical interviews. It helps you achieve this in three main ways:
1. Organize, Categorize, and Analyze
The intuitive UI/UX makes it simple to organize and categorize problems. In addition, a detailed statistic breakdown of every problem you add to Repcode is available, helping you target your weaknesses and identify your strengths. You can also store notes and commented solutions with each problem, allowing you to refer back to them at any time for further review.
2. Spatial Repetition Review
A built-in spatial repetition algorithm ensures you don't forget what you've learned, intelligently scheduling reviews of past problems to reinforce your understanding.
3. AI-Powered Feedback
Integrated AI (trained on the problem and its optimal solution) provides instant feedback on your solutions, helping you identify mistakes and areas for improvement in real-time.
We will expand on each of these features in more detail below. But first, let's clarify how Repcode is meant to be used and what it is not designed for.
What Repcode is not
Repcode is not intended to replace Leetcode but rather to complement it. Think of Leetcode as your textbook and Repcode as your personalized notebook for problem-solving. Repcode helps you organize, review, and receive feedback on your work, making the learning process more structured and effective.
To master Leetcode, it's important to understand that simply tackling random problems without focus or strategy isn't the best approach. Technical interviews often test your grasp of key data structures and algorithms, so building a strong foundation is critical. For example, trying to solve complex backtracking or binary search problems before you fully understand arrays and two-pointer techniques isn't productive.
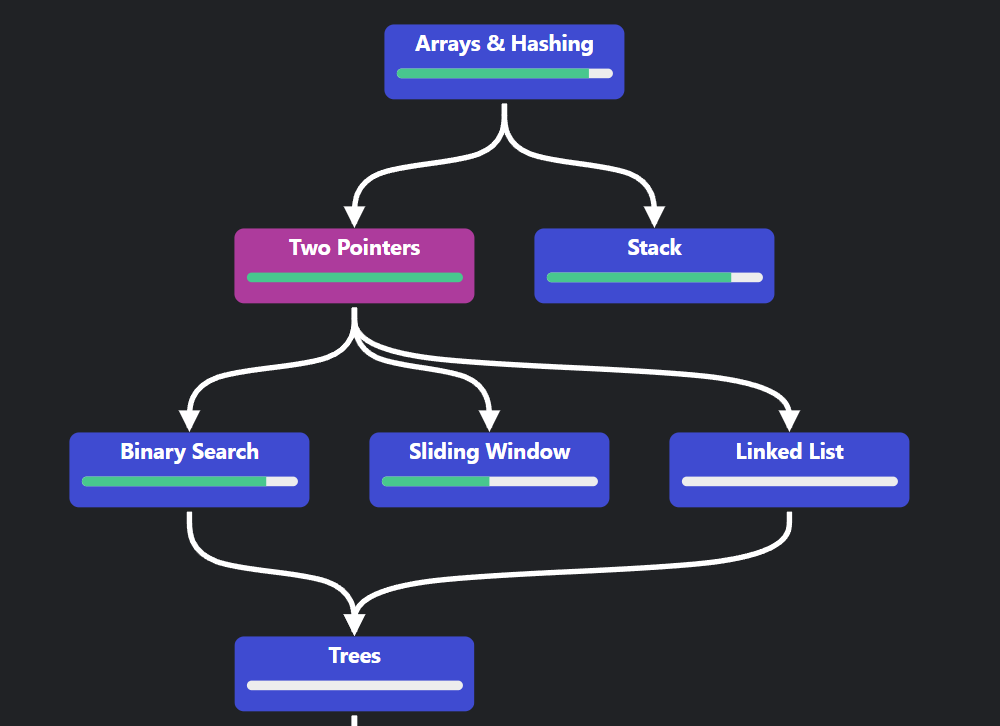
Mastering Leetcode requires solving problems in patterns, progressing from fundamental concepts to more complex ones. Roadmaps like the Neetcode 150 guide you through this process by organizing problems into patterns. Once you grasp the patterns, you're better equipped to solve a wide variety of new, unseen problems.

The top part of the Neetcode 150 roadmap
So then, where does Repcode factor in? Repcode provides a way to create custom collections to group problems by pattern or concept. For instance, if you're studying linked lists, you can create a collection called "Linked Lists" and store all your Leetcode problems, notes, and solutions for that pattern in one place. This allows you to easily revisit problems and review your thought processes.
Additionally, every problem you add to a collection is automatically included in Study Mode, which leverages the spatial repetition algorithm. This ensures you review problems at the optimal time for retention, so you won't lose track of what you've learned and reinforce your learning over time.
To further enhance your study process, Repcode integrates with an AI-Powered Assistant that provides instant feedback when you're stuck on a solution, giving you helpful hints and corrections in real-time.
In short, Repcode addresses three major challenges when it comes to mastering Leetcode: Organization, Review, and Feedback — all with the help of collections, Study Mode, and AI integration.
Key Takeaways
Problem source (textbook)
Learning tool (notebook)
Maximum benefit
Part 0: Exploring the Platform
Before we dive into the specifics of how Repcode works, let's first explore the platform itself. When you login, you will see an expandable sidebar on the left. Use this to navigate to the different parts of the platform. Each symbol in the sidebar will take you to a separate page:
Collections
View and manage your collections. Here, you can see a grid layout showing all the collections you have made so far, and you can click into any one of them to access the problems stored within. You can also edit, delete, and create new collections from this page.
Study
Review problems using spatial repetition. A more detailed breakdown of how this works can be found in the following sections.
Settings
Customize various aspects of the spatial repetition algorithm. Again, a detailed breakdown of these settings can be found in the following sections.
Homepage
Exit the application and return to the main landing page.
Help
Opens a new window to the guide page (where you are right now!)
Logout
Sign out of your account.
Part 1: Organization and Customization
The first part of this guide will cover how to use Repcode to effectively organize your Leetcode problems, and attach notes and solutions to them. As mentioned earlier, the best way to improve at Leetcode is to break down problems into patterns and focus on practicing within those specific patterns. Repcode makes this easy by allowing you to create collections.
Each collection can hold multiple problems, and you can customize these collections as needed. For example, you can rename a collection at any time by clicking the pen and paper icon on the bottom left of the collection card. You can also delete a collection by clicking the trash icon next to it, but keep in mind that doing so will permanently delete all the problems within it, and this action cannot be undone.

An example dashboard showing some collections
From the dashboard view, which shows all your collections, you can quickly access key information at a glance. This includes when the last problem was added to a collection, as well as a breakdown of the problems by type — categorized into New, Learning, and Review stages. The color bar at the bottom gives you an instant snapshot of your progress within each collection. The more green the bar, the better your understanding of that pattern, as it means more problems are in the Review stage, indicating strong familiarity. Note that if there is a red warning symbol next to the Last Updated date, it means it has been longer than a month since you last solved a new problem from that collection, so it's recommended you should try and solve a new one soon to keep your understanding fresh! Remember that it is important to tackle novel problems from time to time, in addition to reviewing old ones!
When creating a new problem in a collection, you will be prompted to fill out a form with all sorts of information about the problem. You can enter the Leetcode problem number and click Autofill to automatically scrape these details from Leetcode directly, or you can manually fill out the details yourself. These include:
| Field | Description |
|---|---|
| Name | The problem's name as listed on Leetcode. |
| Question | The actual problem statement itself. |
| Solution | The code solution to the problem. It is recommended you put your own solution here, one that makes sense to you. |
| Function Signature (optional) | The boilerplate code associated with the solution. On Leetcode, if you select any random problem you will notice there is already some boilerplate code in the code editor: this is the function signature. We ask for it so that we can mimic this in our own code editor. |
| Programming Language | The programming language you will use to solve the problem. Used for syntax highlighting/AI integration purposes. |
| Link to Problem (optional) | The URL that will direct to the problem's page on Leetcode. |
| Additional Notes (optional) | Any notes you wish to make for yourself about the problem. |
| Problem Difficulty | The problem's difficulty as shown on Leetcode (easy, medium, or hard). |
And that's it — organizing your problems is that simple! Once a problem is logged into a collection, you can easily return to it at any time to re-solve it, view your solution, and receive feedback all within the platform. No need to maintain Excel spreadsheets or juggle multiple browser tabs—Repcode keeps everything organized in one place for you.

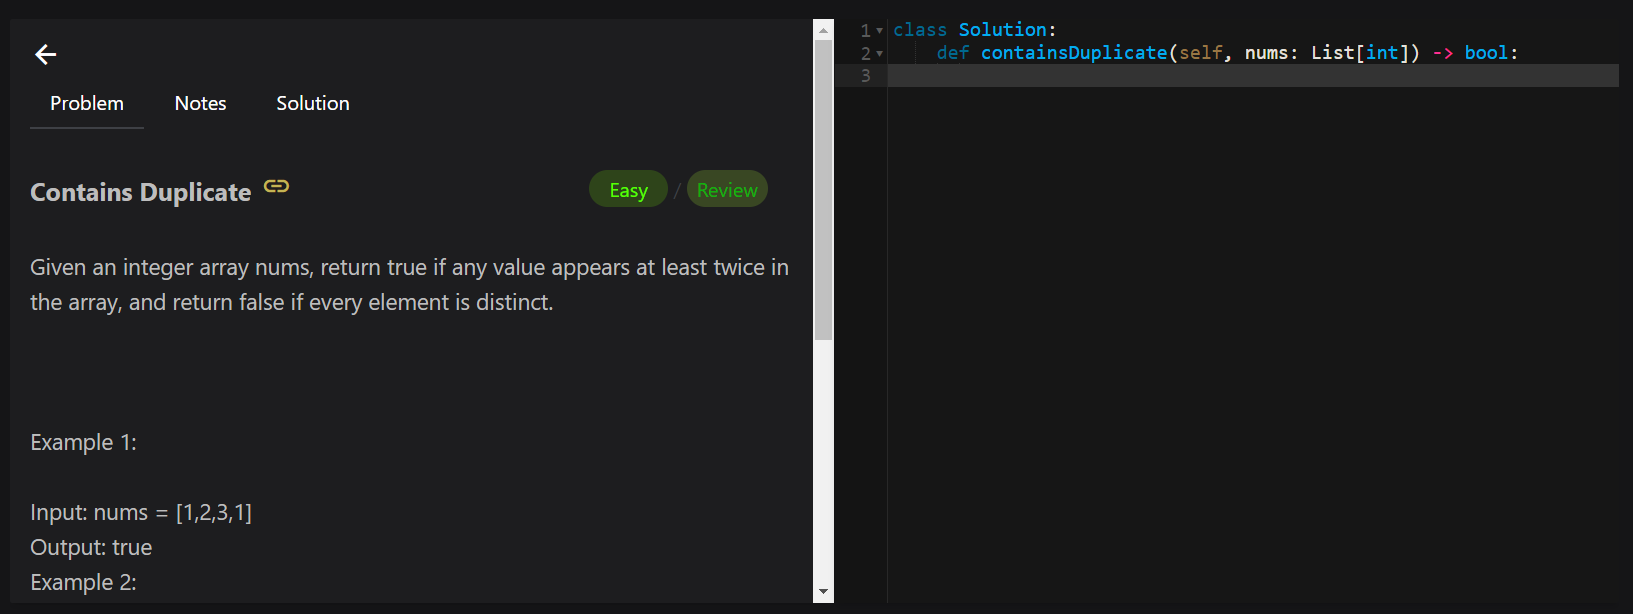
What the problem view looks like
When you add a problem to a collection, it will also automatically be integrated into Study Mode, which leverages the spatial repetition algorithm mentioned earlier. This ensures that you review problems at the optimal time to reinforce your learning. If you delete a problem from a collection, it will also be removed from Study Mode. For more information about this, refer to the next section.
Key Takeaways
Organize your problems by patterns
Personalize every detail
Repcode tracks everything
Part 2: The Spatial Repetition Algorithm
One of the unique aspects of Repcode is its ability to not only help you store and organize problems, but also review them efficiently through Study Mode, powered by a fully customizable spatial repetition algorithm. This algorithm, similar to the one used by Anki, ensures that you never forget what you've learned by spacing out your review sessions. As of this writing, Repcode is the only actively maintained platform that offers this feature out of the box.
What is spatial repetition? In short, it's a learning technique that schedules review sessions at increasing intervals to improve long-term retention. It's based on the idea that the brain retains information best when it's reviewed at strategic points, rather than in one sitting. Also, the algorithm is very smart, and will quickly determine what data structures and specific problems you struggle with, and which ones you find easier, and adjust itself accordingly so that you spend more time on problems that you have trouble with.
This section will be split into two sub-parts:
How to use Study Mode
Learn the basics of navigating and using the study mode feature.
How the algorithm works
Understand the technical details of how the spatial repetition algorithm functions.
Part 2.1: How to use Study Mode
First, the easy part: how to use it. The great thing about Study Mode is that it's largely automatic — the spatial repetition algorithm updates and manages itself. Whenever you add a problem to a collection, it's automatically included in Study Mode and factored into the algorithm.
Your role is minimal: just navigate to the Study Mode section and, when you have problems due for review, a "Study Now" button will appear. Clicking this button will prompt you to solve the problems assigned for that day.
After solving each problem, head to the Solutions tab and choose the button that best reflects how difficult you found the problem:
Again
For problems you couldn't solve
Hard
For problems that were difficult
Good
For problems you solved well
Easy
For problems that were very easy
If certain buttons aren't available for a problem, don't worry — this is intentional. Based on factors such as the problem's difficulty and current type, the algorithm may restrict some options to ensure more accurate feedback. Here's a quick guide on when to choose each option:
| Button | Description |
|---|---|
| Again | Press this one if you had no idea how to even approach the problem. |
| Hard | Press this one if you were able to at least come up with a solution that passed some test cases, but was not optimal. |
| Good | Press this one if you could come up with and thoroughly explain the optimal approach to solving this problem. |
| Easy | Press this one if you could optimally solve the problem very quickly with little thought. |
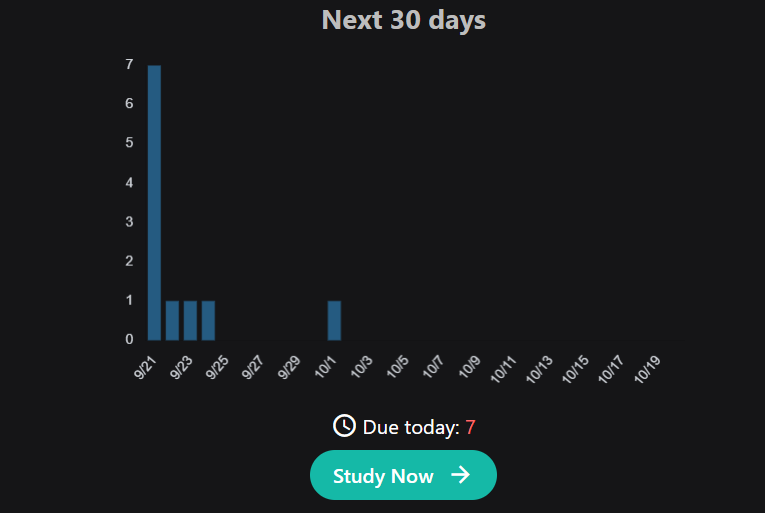
Each day, the algorithm will assess the feedback you've given on the problem and other factors to decide when you should review it again.

A bar graph showing future review session workloads
It is important to use Study Mode consistently — daily practice is ideal to keep your workload manageable. But don't worry if you miss a few days; the algorithm won't break. Problems you miss will simply be pushed to future days. However, keep in mind that delaying too many days will increase your workload in the future, so try to stay on top of your reviews to avoid falling behind.
You might also notice that each problem in Repcode has an associated Type. These types help the spatial repetition algorithm determine how often you should review each problem based on how well you know it. The types are:
| Type | Description |
|---|---|
| New | A problem is classified as New when it's first added. You haven't given any feedback yet, so the algorithm doesn't know how well you understand it. A problem cannot revert to the New state once it leaves it. |
| Learning | A problem that's in the process of becoming a Review problem. You can solve it, but the algorithm has determined that your grasp is not yet strong enough. |
| Relearning | A problem that was previously categorized as Review, but due to poor recent feedback, it has returned to a state where more practice is needed. |
| Review | A problem you are confident in and can solve without much effort. These problems will appear less frequently in Study Mode, as the algorithm considers them well-understood. |
Key Takeaways
Just create problems and give feedback
Rate problems based on your performance
Stay consistent for best results
Part 2.2: How the Spatial Repetition Algorithm Works
Second, let's now delve into how the spatial repetition algorithm works, how the different settings are related to it, and how you can tweak them to make the algorithm more tailored to your learning style. Keep in mind that the default settings are not arbitrary; they were carefully chosen because they represent what works best for most users. However, if you'd like to tailor the algorithm to better suit your needs, this section will explain the settings in detail and how to adjust them.
While entire books have been written about the spatial repetition algorithm, we'll keep it concise here. To get a deeper understanding of the technical aspects, I highly recommend watching the two videos below. Both were extensively referenced when we implemented the algorithm in Repcode. Although these videos discuss Anki, the algorithm used in Repcode is identical.
If you plan on using Repcode long term, and truly want to understand how the algorithm works and how to make it work best for you, I highly recommend watching the above two videos. For now, let's discuss the settings, how they relate to the algorithm, and how you can customize the settings to match your needs. But first, some key terms:
| Term | Definition |
|---|---|
| Interval | The interval represents how long the algorithm waits before showing a problem for review again, in days. Based on your feedback (via the buttons: Again, Hard, Good, Easy), the current interval, problem type, and other factors, the algorithm will calculate the next review interval. |
| Ease Factor | This percentage indicates how easy the algorithm believes a problem is for you to solve. The easier a problem has been in the past, the greater the Ease will be, and the longer the intervals between reviews will be. Initially, all problems start with the same ease factor, but it adjusts based on your performance. |
Alright, so with that vocabulary out of the way, let us now talk about each of the settings in detail, what they do, along with examples so you can fully understand how they all work in relation to the spatial repetition algorithm. Again, to truly understand how everything works, please watch the above two videos in full.
| Setting | Default Value | Description |
|---|---|---|
| Learning steps | 10m, 1d | These apply to New/Learning problems. The first number (10m) represents how soon you'll see the problem again if you press Again. Every time you press Good, the problem advances to the next step (e.g., if the next step is 1d, you'll see it in 1 day). |
| Graduating interval | 3d | After a problem has gone through all its learning steps and you press Good, it "graduates" from a Learning problem to a Review problem. The graduating interval determines when it will be shown to you again right after it becomes a Review problem. |
| Easy interval | 4d | If you press Easy during the learning steps, the problem skips all remaining steps and immediately graduates to a Review problem. The easy interval determines when it will next appear. |
| Relearning steps | 10m | When you press Again on a Review problem, it changes to a Relearning problem. It must then go through the Relearning steps before it can become a Review problem again. These steps function similarly to Learning steps. |
| New interval | 0.75 | A percentage (less than 100%) that will be applied to the ease factor of Relearning problems once they graduate and become Review problems again. It ensures that even though a problem is back in Review, it's reviewed more frequently to reinforce your knowledge. |
| Maximum interval | 180 (in days) | This is the maximum number of days a Review problem can go without being shown again. It prevents overly long gaps between reviews. |
| Starting ease | 2.5 | This is the starting ease factor for newly created problems. A higher number results in longer intervals, while a lower number shortens the intervals. |
| Easy bonus | 1.3 | When you press Easy on a problem, this multiplier is applied to the interval, increasing it significantly more than it would have if you pressed Good. |
| Interval modifier | 1.00 | An extra multiplier that is applied to all review problems. At its default of 1.00 it does nothing. If you set it to 0.80, for example, intervals will be generated at 80% of their normal size (so a 10 day interval would become 8 days). You can thus use the multiplier to make your reviews less or more frequent. In other words, make the algorithm more or less aggressive. |
| OpenAI key | null | Enter your OpenAI API key here to be able to use the AI Feedback feature. This setting is unrelated to the spatial repetition algorithm but is required for enabling AI-generated feedback. |
Key Takeaways
Watch the above videos to fully understand how it works
You can customize the algorithm by changing various settings
Part 3: AI Feedback
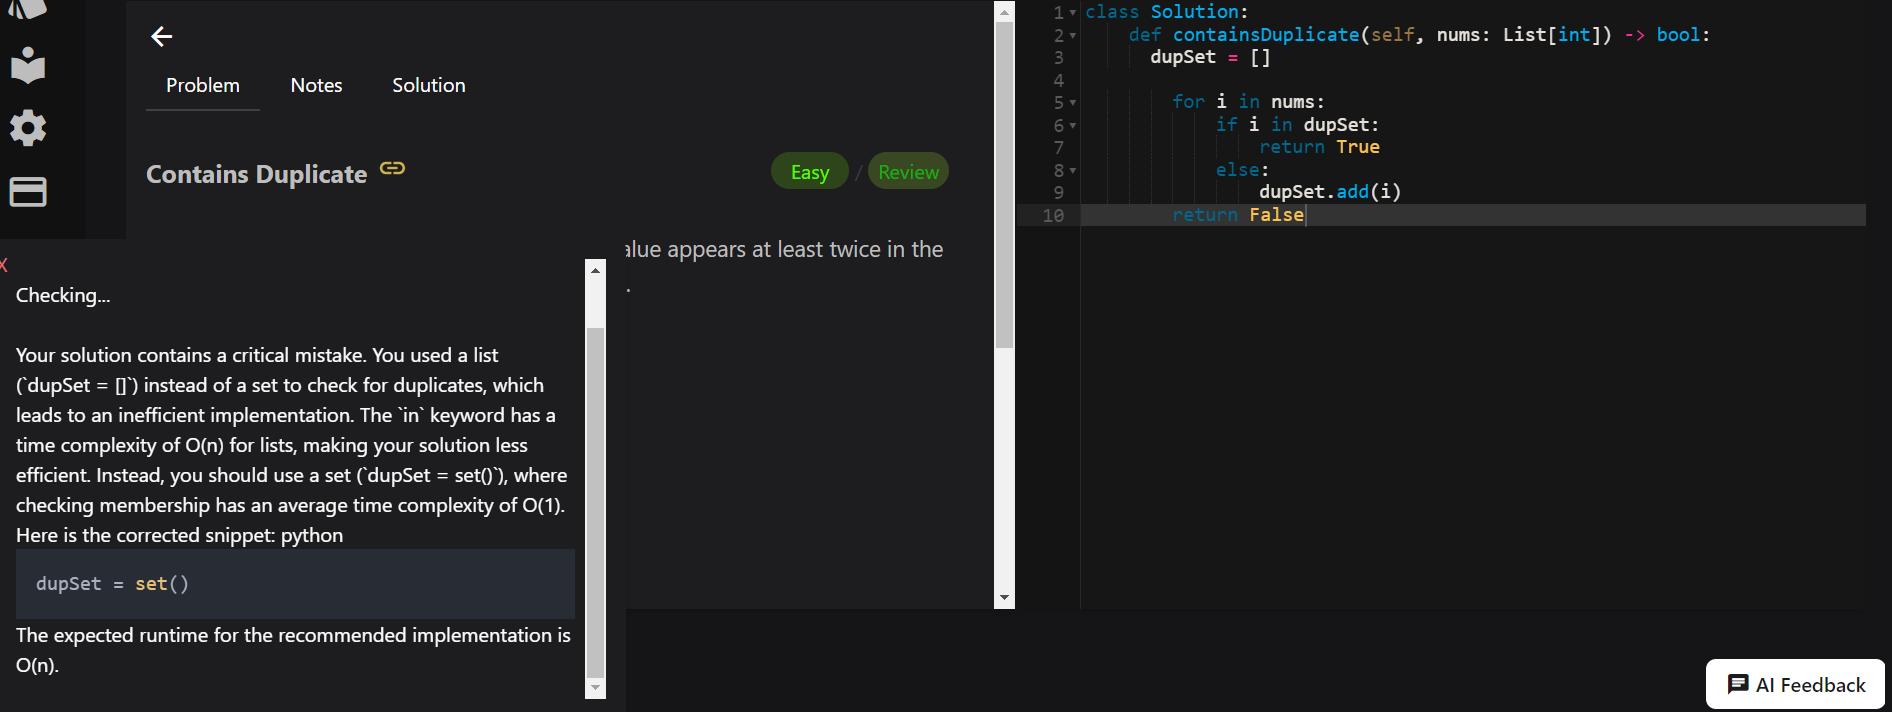
The final key feature of Repcode is its AI-powered feedback system. For every problem, you'll find an "AI Feedback" button that opens a chat window where the AI analyzes your solution. In a few sentences, the AI will determine if your solution is correct, and if not, it will highlight specific areas of your code that are flawed and explain why.

An example of the AI giving feedback on a classic Leetcode problem
Before generating feedback, the AI is provided with the problem statement and the optimal solution for context. It compares your solution to the optimal one and offers detailed feedback, including a comparison of runtimes between the two solutions. Additionally, the AI provides a brief explanation of the optimal approach to solving the problem.
To use the AI feedback feature, ensure that you have entered a valid OpenAI API key on the Settings page. For security reasons, once you input your API key, it will be hidden from view in the input field but will remain active.
Key Takeaways
Validates your code solutions
Instantly identifies issues
Required for AI functionality